
Rose and Argyle Backpack ID Tag and Pouch with Duck Tape #ad
5:00:00 PM
This is a Sponsored post written by me on behalf of Walmart for SocialSpark. All opinions are 100% mine.
It's back to school time, and this is the first time I've had a child who is going to "real" school. Lil Bit starts Kindergarten in less than 2 weeks! She is both excited and nervous about her new school, and I wanted to get her even more excited by creating a fun, personalized backpack label for her new backpack. But she'll be going to a public school, going back and forth between that school and her daycare, and I wanted to make sure I had a durable yet fun backpack name tag. Here's what I came up with:

I quickly realized that the awesome patterns available and durability of Duck Tape is the perfect combination for our back to school needs! So, one Friday evening I went to buy Duck Tape at Walmart.
I was amazed at the selection of colors and patterns...I knew that Duck Tape® has recently come out with new patterns and products, but I had no idea...Look at this selection!
.JPG)
I wanted a solid color and a pattern, so with Lil Bit's backpack in mind, I picked up a roll of hot pink and a roll of pink and gray argyle.

After thinking about it, I didn't want to have Lil Bit's name out for everyone to see on her backpack, so I looked at luggage tag ideas and realized quickly that in creating a flap to cover up her name, I was halfway to creating a pouch for her to keep little things in--perfect!
Here's what I used:
Two contrasting colors of Duck Tape®
Scissors
Snaps and grommets (and required tools based on your hardware--optional)
Permanent Marker
Keyring
First, I laid out two long strips of the argyle patterned Duck Tape®, sticky side up. I made it longer than I though I would need, so I would have room to trim. I overlapped the tape about 1/8 of an inch, aligning the pattern.

I then placed the solid pink tape crossways on the argyle Duck Tape®, sticky side down, with at least a half inch of overhang, and overlapping each strip of pink by 1/8 inch.

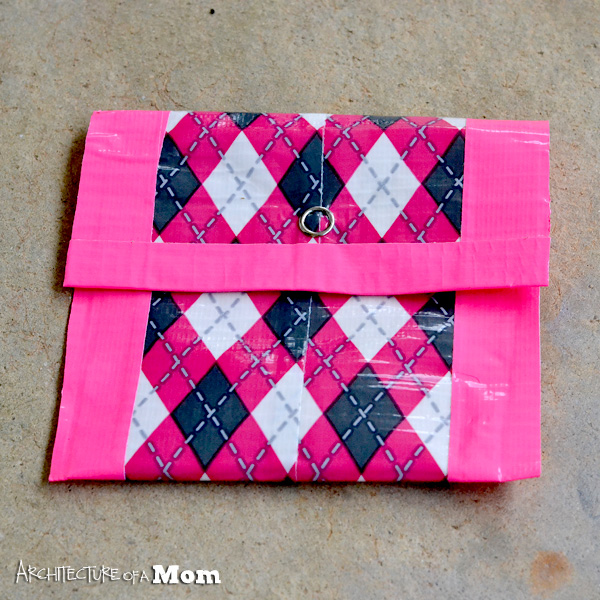
I then trimmed down both side with scissors so I had a long rectangle that was solid pink on one side, and argyle on the other. I then folded the rectangle roughly into thirds, with the top third a little shorter than the other segments. I took a piece of the pink tape, cut in half lengthwise, and taped up the sides of the pouch.

Once the pouch had all edges lined in the pink Duck Tape®, I used a used a grommet punch to place a grommet in the corner.

The same punch also does snaps, so I used a snap to fasten my pouch. You could easly sew a snap on, or use velcro--whichever you are most comfortable with!
But since I had used a snap, I wanted something to cover up the snap...Duck Tape® to the rescue again--you can make a quick rose by folding down 1/3 of the length of a piece of Duck Tape® onto itself, and then roll it up...voila, you have a rose that took you about 60 seconds to make! You can either sew or hot glue the rose onto the pouch.

All I did to make this into a label is write her name and my contact information into the inside of the front flap. I attached it to the backpack with a keyring. Now, if the backpack is lost, then it is clearly labelled, but it doesn't scream her name to any strangers who might see her with her backpack...and because it was made with Duck Tape®, I know it will hold up, and it's the perfect cool accessory for my kindergartener!

Lil Bit is really excited to use her Duck Tape® pouch--and thinks she's pretty cool, too! Want more inspiration? Check out @theduckbrand on twitter. Enjoy!


It's back to school time, and this is the first time I've had a child who is going to "real" school. Lil Bit starts Kindergarten in less than 2 weeks! She is both excited and nervous about her new school, and I wanted to get her even more excited by creating a fun, personalized backpack label for her new backpack. But she'll be going to a public school, going back and forth between that school and her daycare, and I wanted to make sure I had a durable yet fun backpack name tag. Here's what I came up with:
I quickly realized that the awesome patterns available and durability of Duck Tape is the perfect combination for our back to school needs! So, one Friday evening I went to buy Duck Tape at Walmart.
I was amazed at the selection of colors and patterns...I knew that Duck Tape® has recently come out with new patterns and products, but I had no idea...Look at this selection!
I wanted a solid color and a pattern, so with Lil Bit's backpack in mind, I picked up a roll of hot pink and a roll of pink and gray argyle.
After thinking about it, I didn't want to have Lil Bit's name out for everyone to see on her backpack, so I looked at luggage tag ideas and realized quickly that in creating a flap to cover up her name, I was halfway to creating a pouch for her to keep little things in--perfect!
Here's what I used:
Two contrasting colors of Duck Tape®
Scissors
Snaps and grommets (and required tools based on your hardware--optional)
Permanent Marker
Keyring
First, I laid out two long strips of the argyle patterned Duck Tape®, sticky side up. I made it longer than I though I would need, so I would have room to trim. I overlapped the tape about 1/8 of an inch, aligning the pattern.
I then placed the solid pink tape crossways on the argyle Duck Tape®, sticky side down, with at least a half inch of overhang, and overlapping each strip of pink by 1/8 inch.
I then trimmed down both side with scissors so I had a long rectangle that was solid pink on one side, and argyle on the other. I then folded the rectangle roughly into thirds, with the top third a little shorter than the other segments. I took a piece of the pink tape, cut in half lengthwise, and taped up the sides of the pouch.
Once the pouch had all edges lined in the pink Duck Tape®, I used a used a grommet punch to place a grommet in the corner.
The same punch also does snaps, so I used a snap to fasten my pouch. You could easly sew a snap on, or use velcro--whichever you are most comfortable with!
But since I had used a snap, I wanted something to cover up the snap...Duck Tape® to the rescue again--you can make a quick rose by folding down 1/3 of the length of a piece of Duck Tape® onto itself, and then roll it up...voila, you have a rose that took you about 60 seconds to make! You can either sew or hot glue the rose onto the pouch.
All I did to make this into a label is write her name and my contact information into the inside of the front flap. I attached it to the backpack with a keyring. Now, if the backpack is lost, then it is clearly labelled, but it doesn't scream her name to any strangers who might see her with her backpack...and because it was made with Duck Tape®, I know it will hold up, and it's the perfect cool accessory for my kindergartener!
Lil Bit is really excited to use her Duck Tape® pouch--and thinks she's pretty cool, too! Want more inspiration? Check out @theduckbrand on twitter. Enjoy!
I love to party! Sometimes I link up my posts to Organizing Junkie, Tidy Mom and these link parties! You should come party with me and check out some awesome new bloggers!


0 comments