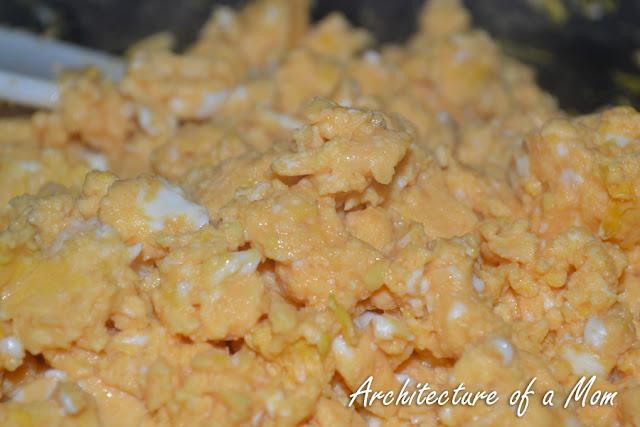
This morning, we woke up and discovered a {slight} chill to the air. I'm starting to think more about fall...and that makes me think about fall food. I've been in the mood for some apples, which is why I've come up with this apple pie granola. It'll be a few more weeks before apples are officially in season, so I've skipped a few steps and ingredients and used some canned apple pie filling, but trust me, this means it feels more dessert for breakfast--yum!
Here's what you need:

6 cups old-fashioned oatmeal
1/2 cup whole wheat flour
1/2 cup other grain (I used baby cereal, but you could use cornmeal, rice meal, etc)
1 tsp cinnamon
1 tsp cloves
1/2 cup vegetable oil
1 can apple pie filling (use kitchen shears to cut up the pieces of apple into about a 1/2 inch dice)
Preheat oven to 350. Mix up dry ingredients. Then add the oil and pie filling.

Mix well, then spread onto a greased non-stick pan.

Bake for 60-70 minutes, stirring well every 20. Let cool, and then store in an air-tight container in the refrigerator. And enjoy your yummy, autumnal breakfast alone, or with milk or yogurt. It tastes a lot like apple crisp!


I love to party! Sometimes I link up my posts to Organizing Junkie, Tidy Mom and these link parties! You should come party with me and check out some awesome new bloggers!

This week promises to be another crazy one! Lil Bit starts Kindergarten on Thursday, and my husband is planning on working late every night this week...until the long weekend! So we'll be looking at a menu that the kids won't protest and that Mom can make easily by herself!
Here's the plan:
Monday: Hot Dogs and Fruit
Tuesday: Easy Baked Penne

Wednesday: Chicken Nuggets, Juice up Carrots, and Fruit

Thursday: Chicken on the Grill, Baked Sweet Potatoes, Bread
Friday: Easy Savory Meatballs, Green Beans, Bread

Saturday: Hamburgers, Fruit, Corn
Sunday: Leftovers
What are you eating this week?
I love to party! Sometimes I link up my posts to Organizing Junkie, Tidy Mom and these link parties! You should come party with me and check out some awesome new bloggers!
This is a Sponsored post written by me on behalf of Walmart for SocialSpark. All opinions are 100% mine.
It's back to school time, and this is the first time I've had a child who is going to "real" school. Lil Bit starts Kindergarten in less than 2 weeks! She is both excited and nervous about her new school, and I wanted to get her even more excited by creating a fun, personalized backpack label for her new backpack. But she'll be going to a public school, going back and forth between that school and her daycare, and I wanted to make sure I had a durable yet fun backpack name tag. Here's what I came up with:

I quickly realized that the awesome patterns available and durability of Duck Tape is the perfect combination for our back to school needs! So, one Friday evening I went to buy Duck Tape at Walmart.
It's back to school time, and this is the first time I've had a child who is going to "real" school. Lil Bit starts Kindergarten in less than 2 weeks! She is both excited and nervous about her new school, and I wanted to get her even more excited by creating a fun, personalized backpack label for her new backpack. But she'll be going to a public school, going back and forth between that school and her daycare, and I wanted to make sure I had a durable yet fun backpack name tag. Here's what I came up with:
I quickly realized that the awesome patterns available and durability of Duck Tape is the perfect combination for our back to school needs! So, one Friday evening I went to buy Duck Tape at Walmart.

I enjoyed this simple fish stew I threw together this weekend. I wish I could say that our kids loved it, too. I thought I did everything I could to make it palatable to the preschool set--I used crushed tomatoes to create a texture like ketchup, which is in huge demand around here. I used white bean, which are a favorite here at my house. I even kept the spices mild. And guess what...the very thought about having fish in anything other than fish sticks...well, let's just say more ended up on the table than in tummies. I think I need to work more on disguising the fish.

Here's the star of the stew...I love rosemary. We've been growing rosemary for several years now, and it's really a great starter herb--it's a perennial, and stand up to a lot of abuse if you keep the soil from getting too moist (our plant is in a half wine barrel with lots of drainage).
However, I liked the recipe...and so did my husband. Therefore, although I won't label this recipe as kid approved, I will say that it is very yummy--as long as you like fish. The leftovers were even better the next day for lunch.
Here's what you need:


(4) filets of tilapia
cooking spray
(2) 15-16 oz. cans of white beans (cannellini or navy beans are perfect), rinsed and drained
(1) 28 oz can crushed tomatoes
1 clove garlic, minced (jarred garlic is perfect here)
1 sprig of fresh rosemary, minced
1 chicken boullion cube, crushed
1 cup water
1/2 cup diced onion
1 pinch creole seasoning (or more to taste)
salt and pepper to taste
Spray cooking spray on the bottom of a large soup pot. Lightly salt and pepper tilapia and cook until just done (flesh will flake easily with a fork). Remove fish from pot and keep warm.

Combine remaining ingredients and simmer for at least 15-20 minutes, or until flavors combine.

Serve fish on top of soup, with crusty bread on the side.

Serve fish on top of soup, with crusty bread on the side.

Anybody have a better idea on how to hid fish than stew? I {obviously} need to work on this.

Enjoy!
I love to party! Sometimes I link up my posts to Organizing Junkie, Tidy Mom and these link parties! You should come party with me and check out some awesome new bloggers!
I try to be as positive as possible on this blog. But in
between the recipes and crafts and DIY, I also try to be real. Last week was a
tough one for me. Nothing untoward happened to me or mine physically, but a
coworker’s relative had a still-born baby. This little one was about as far
along as my twins were when we had them. Maybe it was the close gestational age
of the baby to my twins when they were born. Maybe it was because this sad
event (that occurred to someone I don’t know!) happened almost 3 years to the
week of my miscarriage. I don’t know why it hit me so hard, but I teared up
talking to my coworker about it, and a week later, it still makes me tear up.
And I thought, why shouldn’t I share this with you? Because
I am pretty sure that there are others of you who have lost a little one. In
fact, I know so. One of my favorite blogging buddies blogs over at NoHolding Back and she has so much to say about how she lost one of her sweet
little twins so early--just a couple days after she was born. She’s a real expert on the subject, and an amazing
advocate for the March of Dimes.
So I just wanted to share my thoughts on losing a baby. These same things may apply if you've lost a non-baby child--I can only speak from my experience of losing my unborn baby. I’m
not a professional, and I definitely won’t win any counseling awards—these are
the thoughts of a mom who has been there...pure and simple.
- It hurts. Let it hurt. Mourn, in whatever way works for you. I spent my evenings crying until I had no tears left, but I only took a long weekend to recover before going back to work. I just couldn’t handle sitting at home—keeping busy was the key for me. Your mourning may look different. Don't let anyone belittle your loss. Losing a child is a huge--don't let anyone say anything different.
- You are not alone. When I had my miscarriage, I was amazed at how many women I know that came forward and mourned with me. Some, I knew had miscarried. Others had chosen to mourn in silence and I only became aware of their loss when I, too, lost my baby. If you need someone to come along side you, open up and share what is happening…I think you will be surprised at how many people will share their loss with you.
- It gets better, but it never really goes away. I hadn’t thought of my little miscarried baby in depth for a while, but as soon as my coworker shared what happened, it all came rushing back. The pain is there, but time has dulled it.
- More babies don't heal the wound. I was super blessed to become pregnant with my twins only a couple months after the miscarriage. However, the next pregnancy doesn't make it "all better." But in some ways, that next pregnancy was so much more difficult. When you’ve lost a baby, all of the sudden it is so much more difficult to “bond” to that baby (or in my case, babies) while you are pregnant. It’s so much more difficult to get excited about the pregnancy, the nursery, new baby clothes, because you worry that that horrible loss will happen again. This is normal, and it’s even more difficult to get excited about a pregnancy that is high risk, as mine was with the twins.
I could keep going, but I'm starting to tear up again, and I really want to post this today. Today, apparently, is A Day of Hope, and day for speaking for children who are no longer here, started by CarlyMarie and Project Heal.If you have lost a child, please share your story--you never know who it might help.
Hugs,
I love to party! Sometimes I link up my posts to Organizing Junkie, Tidy Mom and these link parties! You should come party with me and check out some awesome new bloggers!
It's going to be a busy week for us! We have fantasy football drafts (one for my husband, on for me), kindergarten open houses, and general mayhem going on this week (which is entirely normal around here). So we'll be doing a lot of quick and easy around here!
Monday: Sneaky French Bread and Bacon
Tuesday: Chicken Alfredo, Bananas
Wednesday: Chicken Nuggets, Juiced Up Carrots, Rice, Apples
Thursday: Pork Chops, Broccoli, Bread
Friday: Barbecue Chicken Pizza

Saturday: Hamburgers, Fruit
Sunday: Leftovers
What are you eating this week?
I love to party! Sometimes I link up my posts to Organizing Junkie, Tidy Mom and these link parties! You should come party with me and check out some awesome new bloggers!
Do you love wallpaper (or wallcovering as we in the design field like to call it) but don't want to commit the time, energy, and money to wallpapering a room? Or does the actual commitment to such a bold design move give you hives? Or maybe you rent your home, and you aren't allowed to use wallpaper.
Here's the solution...use wallpaper as art! And even better, you can re-use home improvement leftovers as your wall paper base!


Here are some ideas that I came up with to use as a base for your art:
- an artist's canvas
- a wood sheet cut to the desired size
- nominal lumber (1x1's would work great) fastened into a square or rectangle.
- rigid foam insulation
And guess what, I didn't use any of these ideas! I wanted to create some more art for my master bedroom, and I had a yard sample of wallpaper in my new color--coral! For my base, I used a preformed foam trim rectangle molding piece! We had it leftover from creating a decorative wainscot base in our dining room--and these molding pieces had been handing out in our garage for, um, years. The wallcovering had been a sample from work, and since I had the foam molding on hand, this project was FREE--the best cost of a project!

Here's what you need:

foam molding (for the size I had, I had enough wallcovering for 2 (18"x24" rectangles)
1 yard sample of wallpaper/wallcovering
upholstery staple gun
Lay out how you want the pattern of the wallpaper to go on your trim (or whatever substrate you are using). Cut your pieces of wallpaper. I didn't trim the pieces until I had them partially stapled down.
Line up a piece of wall paper onto the molding piece.If you've ever re-upholstered a seat of a chair, then you can probably guess what happens next. Staple one or two staples into one side (the long side) then pull tight (make sure you're straight) and staple the opposite side.

You want to make sure that you staple in the thickest part of the trim if it varies like mine did, and make sure your staples aren't too big--you don't want the staples to go all the way through to the "front." Go back and forth between the two long sides until you've got the whole side stapled, pulling tight each time. Then fold over the short sides. You can start trimming at this point, and remember to tuck in the corners, like you're wrapping a gift. Then alternate between the ends, stapling each side, pulling tight.

Not only is this light weight art, but the molding makes for a built-in place to rest the artwork on a nail in the wall--no hanging hardware needed!
I cannot wait to share with you my finished master bedroom! I'm really loving all the new coral touches!

Enjoy!
I love to party! Sometimes I link up my posts to Organizing Junkie, Tidy Mom and these link parties! You should come party with me and check out some awesome new bloggers!
I've been searching for motivation to cook dinner...somehow, in this heat. It's hard to find any kind of reason to heat up food when you're looking at temps above 90. But I've the perfect motivator...

I've found that ice cream acts as a good motivator, both for me to cook and the kids to eat, but we've got to eat fruit, you know...to make it healthy!
So I've come up with this combination of nectarines (in season right now and oh, so sweet), along with cinnamon, and mixed them up in a no churn concoction like my No Churn Rocky Road Ice Cream.

Here's what you need:
1 container whipped topping
1 can sweetened condensed milk
3 nectarines, diced into 1/4 inch pieces
3/4 tsp cinnamon
This is so easy...the hard part is waiting for it to freeze!
Fold all the ingredients together in a freezer safe container.

Freeze overnight.

Seriously...there is nothing else to it...but to enjoy!
I love to party! Sometimes I link up my posts to Organizing Junkie, Tidy Mom and these link parties! You should come party with me and check out some awesome new bloggers!
Hey everyone! It's finally feeling like summer around here! Of course, day after day of 90+ heat does mean that I'm pretty unmotivated to cook...which is probably why most of my recipes lately have been ice cream or popsicles! I know it's not exactly good for my waistline, but everyone loves it...so that's what we're eating. :-)
But it's still time to think about what else to eat (other than dessert), so here's what the plan is for this week:
Monday: Breakfast for Dinner (Healthy with Hidden Veggies!)
Tuesday: Chicken Nuggets and Fiesta Twice Baked Potatoes
.JPG)
Wednesday: Fish Tacos and fruit
Thursday: Asian Sausage

Friday: Barbecue Chicken Pizza
Saturday: Some kind of meat on the Grill
Sunday: Leftovers
What are you eating this week?
I love to party! Sometimes I link up my posts to Organizing Junkie, Tidy Mom and these link parties! You should come party with me and check out some awesome new bloggers!

Do you ever pass up a thrift store find because it’s broken?
Maybe you should think outside the box! I picked up these two wooden boxes at a
thrift store for a dollar each. It looks to me like they were inserts in an
antique secretary or other piece of furniture that someone had added some
bottoms and handles to. The handles were attached with nails that went all the
way through to the inside of the box (DIY upcycle gone wrong, maybe?), and one
of the boxes had a piece of wood missing—the wood had split where it was
nailed.

I considered replacing the bottom piece of wood on broken
box, but then I noticed how the base actually raised the box a little—and that
slit would be perfect to fit cords through. I have seen charging "valets" at Pottery Barn and other stores, but I wanted something with a little more character. And since I'm adding some more character--redoing my master bedroom on a budget--I thought that these little guys could add some character--and much needed corralling of our electronics on our nightstands!
First things first, though--remove the handles on the back whose fastening nails actually penetrated the inside of the box. I really didn't want to risk tetanus just to charge my iphone, after all.


I then painted the wood with white paint to act as a primer. I was planning on sanding down the finished coats of paint to expose this coat--more on that later.


At this point, I was actually surprised that my husband actually liked this color--knowing full well that I was planning on putting these caddies in our room. This color is very close to pink, so I was actually quite amazed at this acceptance. However, I wanted to used the (now clean) label hardware that was now a peachy-pink metallic, and I felt that there wouldn't be a strong enough contrast between the coral and the metal, so it was time to add another color. I chose gray spray paint--it matches my comforter. So I used some painters tape and some high quality masking material...also known as some old newspaper ads.


I was planning on using some sanding to antique the finish a little, exposing the layers of the paint--and I still might, but I'm kind of digging the glossy sheen of the gray paint, so I stopped--sometimes, you have to know when to lay down the tools, right?
I also took some shots of one of the boxes in action...right on my nightstand. It's a difficult location to photograph, with the only natural light in the room coming into the window right behind the nightstands...but hey, what's bad for photography is good for sleep, right?

I absolutely love how these charging stations turned out.

Here's hoping they corral some of the mess!
Sometimes I link up at the following places: 504 Main, A Diamond in the Stuff, Alderberry Hill, At the Picket Fence, Beyond the Picket Fence, Cherished Bliss, Classy Clutter, C.R.A.F.T., Craft-o-maniac, Crafty Scrappy Happy, DIY Showoff, Eat at Home, Finding Fabulous, Gingersnap Crafts, Glued to My Crafts, Home Stories A to Z, House of Hepworths, House of Rose, I Heart Naptime, Lil Luna, Live Laugh Rowe, Made in a Day, My Favorite Finds, Not Just a Housewife, One Creative Mommy, Organizing Junkie, Semi Homemade Mom, Serenity Now, Simply Sugar and Gluten Free, Six Sisters Stuff, So You Think You're Crafty, Someday Crafts, Sugarbee Crafts, Tatertots & Jello, The 36th Avenue, The Frugal Girls, The Grant Life, Thistlewood Farms, The Shabby Nest, Tidy Mom, Today's Creative Blog, Uncommon Designs, and Under the Table and Dreaming.